Is a “CPU fan speed detection error” warning on your computer causing it to behave badly? Although it seems faint, this alert points up a possible issue endangering the condition of your system. To be clear, neglecting a “CPU fan speed detection error” is like neglecting a ticking time bomb under PC hood. This apparently little problem can rapidly turn into overheating, system instability, and even irreversible hardware damage.
Not to worry though! See this as your road map for negotiating the realm of cooling and fan problems. We’ll analyze the typical offenders behind the ” CPU fan speed detection error,” arm you with step-by-step troubleshooting techniques, empower you with preventative steps to keep your system running cool, and even investigate sophisticated BIOS modifications for best performance in this complete tutorial. Let’s get going before your CPU begins to perspire.
Table of Contents
Recognising the CPU Fan Speed Detection Error
Your motherboard failing to pick the expected speed signal from your CPU fan sets off the “CPU fan speed detection error”. Usually a basic voltage or a pulse width modulation (PWM) signal, this one indicates the revolutions per minute (RPM). Should the recorded RPM be less than a threshold set in your BIOS, the motherboard interprets this as an error indication. This is a critical safety function meant to keep your CPU from overheating, therefore preventing performance throttling, system failures, and permanent processor damage.
Motherboard Monitors Fan Speed: How?
Usually a 3- or 4-pin connector labeled “CPU_FAN,” your motherboard continuously tracks the speed of the CPU fan over a dedicated connection. Along with ground, power, and the RPM signal, the 3-pin connection supplies The PWM control signal added by the 4-pin connection lets the motherboard dynamically change the fan speed. Back to the motherboard one of these pins sends the RPM signal. This RPM value helps the system to guarantee sufficient cooling. Sophisticated fan control options abound on modern motherboards.
Typical Sources of a CPU Fan Speed Detection Error
A ” CPU fan speed detection error” can be caused by several things. Good troubleshooting depends on the fundamental problem being identified. Sometimes the mistake is sporadic, which increases the difficulty in diagnosing.
- Incorrect Fan Connection: The fan may not be correctly linked to the motherboard’s CPU_FAN header. Make sure it’s securely inserted and aligned as proper. This is the most often occurring reason.
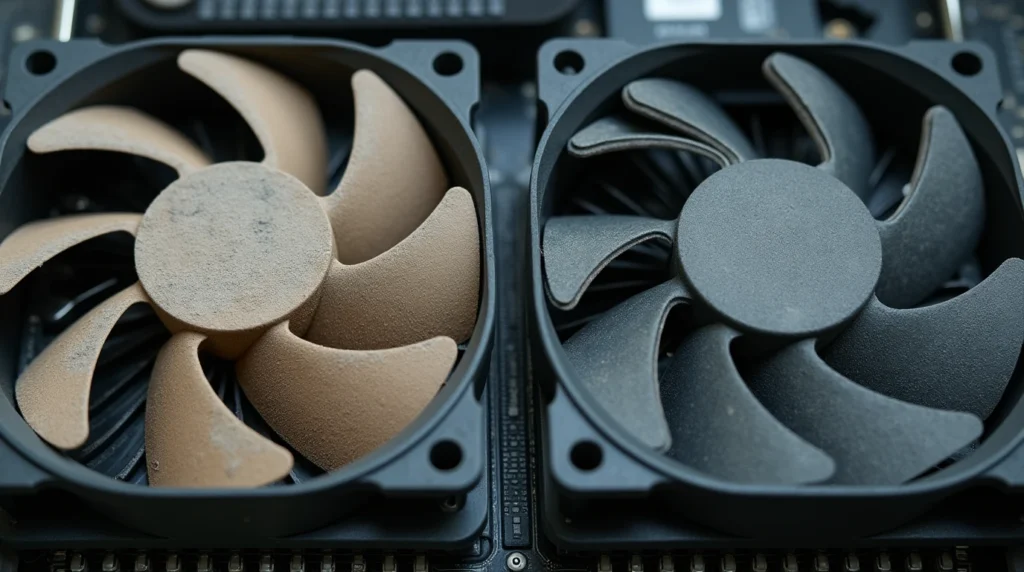
- Dust Buildup: Excessive dust might block the fan blades and heatsink fins, therefore greatly slowing down the fan and causing the error. An insulator, dust traps heat and aggravates the issue more.
- Fan Cable Issues: Damage to a fan wire could cause the RPM signal to change. Look for kinks, frayed wires, or loose connections.
- Faulty Fan: The fan motor itself might be breaking down. The bearings might deteriorate over time, leading to irregular or complete halt of the fan.
- BIOS Misconfiguration: False positives might result from improper fan speed settings in the BIOS, including a minimum RPM too high. Errors will arise if the fan finds it difficult to attain the minimal speed at launch.
- Motherboard Problems: Rarely occurring motherboard problems might include a faulty fan controller. This is more common following a physical harm or a power spike.
- Using a Fan Hub: While fan hubs are great for linking several fans, certain less expensive units might interfere with the RPM signal sent to the motherboard, generating detection problems.
- Liquid Cooler Issues: Should you be using a liquid cooler, the radiator’s fan may not be properly attached or the pump may not be working. The motherboard can be reading the CPU fan RPM instead of the pump RPM, so the error will be set off should the pump fail.
CPU Fan Speed Detection Error Troubleshooting: Methodical Guide
Use these guidelines to identify and fix the “CPU fan speed detection error.” Before operating within the case, always turn off your computer and disconnect it from the outlet. Ground yourself by contacting a metal section of the casing before handling any components; static energy can harm parts.
- Check the Fan Connection: Make sure the fan is firmly hooked into the motherboard’s CPU_FAN header. Reseat the connector to guarantee a right and strong connection. Usually the guilty party is a somewhat loose link. Check that the connection lines up exactly with the pins.
- Clean the Fan and Heatsink: Dust and trash from the fan blades and heatsink fins may be removed with compressed air. Watch especially the places where dust usually gathers. A clean fan more efficiently releases heat and revolves. For tough dust, run a cotton swab or tiny brush.
- Inspect the Fan Cable: Look for any evidence of damage to the fan cord. Should the cord be frayed, kinked, or show loose connections, replace the fan. The signal may be disrupted even by a little cut in the cable.
- Test the Fan: To check whether the fan blades revolve freely, hand spin them. Should they feel stiff or create odd noises—grinding, clicking—the fan may be deteriorating and requires replacement. If at all feasible, compare the resistance to a fresh fan.
- Check and change the BIOS settings:
- Enter the BIOS setup (typically found by using Delete, F2, F12, or Esc at startup – consult your motherboard handbook).
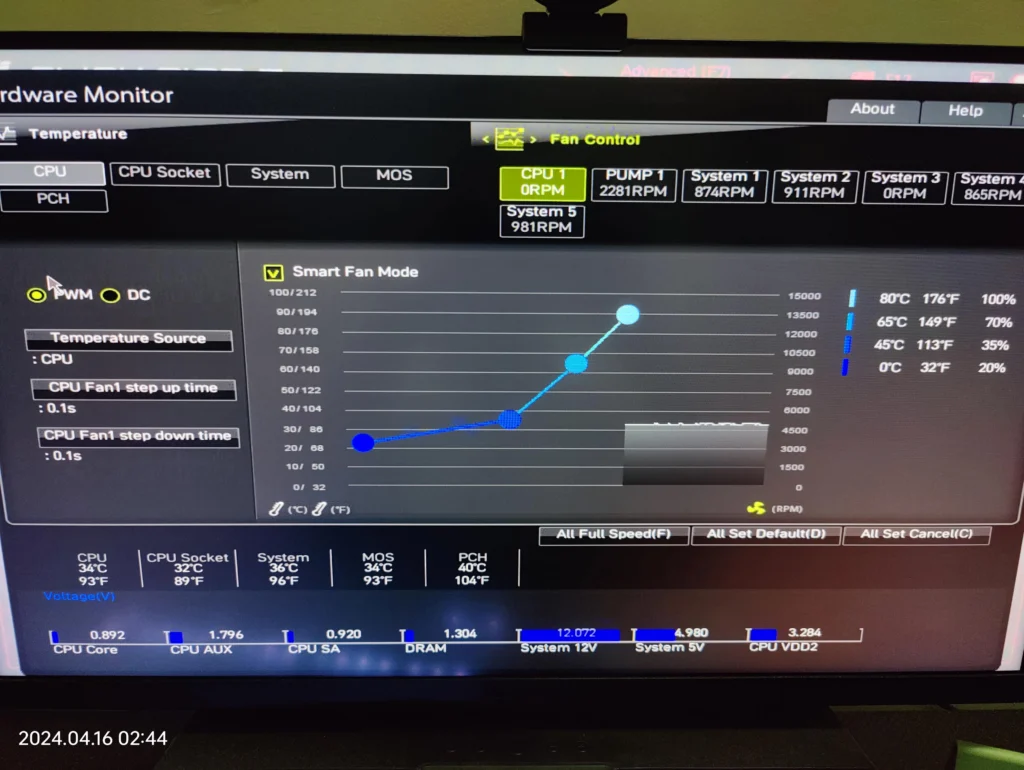
- Go to the “Hardware Monitor,” “Fan Control,” “H/W Monitor,” or related area (the precise name changes depending on the motherboard manufacturer).
- Track CPU fan RPM reading. There probably is an issue if it is 0 RPM or excessively low—that is, less than 600 RPM. On an ASUS motherboard, for instance, this may be found under the “Q-Fan Control” section.
- If available, set the “CPF Fan Speed Control” to “Auto,” “Standard,” or “PWM.” “Auto” lets the motherboard change the fan speed depending on CPU temperature dynamically. “PWM” runs the fan speed under the pulse width modulation signal. Gigabytes motherboards, for instance, usually provide choices including “Normal,” “Silent,” and “Full Speed.”
- Verify the lowest fan speed option. Should it be set too high, reduce it to observe whether that fixes the problem. For instance, some BIOSes let you define a minimum RPM. Try aiming this at between 200 and 300 RPM.
- Look for a “Zero RPM” or “Fan Stop” mode setting. Should it be turned on, the fan could not spin at all until the CPU reaches a particular temperature. Try turning off this to observe if the issue is resolved.
- Disable Fan Monitoring (Last Resort and with extreme caution): Turn off CPU fan speed monitoring in the BIOS as a last option with great caution. Alert: This is rather dangerous and should only be carried only if you are closely monitoring the CPU temperature via other methods and are quite sure the fan is operating as it should. Should the fan fail without observation, your CPU can overheat and cause severe harm. Use this option only in case everything else fails; using programs like HWMonitor or Core Temp, you can closely track CPU temperature. Should deactivating monitoring fix the issue but the fan isn’t spinning, you HAVE to replace it right away.
- Test with a Different Fan: If at all feasible, investigate whether the issue continues by connecting a known-good CPU fan to the CPU_FAN header. This lets one ascertain whether the original fan is the cause of the problem. Should the new fan run perfectly, the old fan must be replaced.
- Update BIOS: Particularly with more recent fans, a BIOS update can occasionally fix compatibility problems. For directions, visit the website of your motherboard maker; next, closely follow the guidelines to prevent bricking your motherboard.
- Inspect the CPU Cooler Mounting: Verify the CPU cooler mounting to be correct for the CPU. Poor heat transmission resulting from a loose cooler might cause the CPU to overheat even with a properly running fan. Before remounting, remove the cooler, clear off the old thermal paste, and then apply fresh thermal paste.
- Consult a Professional: See a professional for guidance. Should none of the following actions fix the “PCU fan speed detection error,” the motherboard or other hardware component might be defective. Think about getting expert advice from a computer repair technician.
Avoiding the CPU Fan Speed Detection Error
Always better than having to handle the ” CPU fan speed detection error” is prevention of it. Over time, proactive maintenance will save your time and aggravation.
- Regular Cleaning: To stop dust accumulation, routinely clean your CPU fan, heatsink, and computer case’s interior. Aim for cleaning based on your surroundings every three to six months.
- Proper Cable Management: Verify that the fan cable is routed correctly and not stretched or broken. Keep the cable free from the path of other components and avoid it from catching in the fan blades by means of cable ties.
- Monitor Temperatures: Track your CPU temperature with monitoring tools such HWMonitor, Core Temp, or the monitoring utilities supplied by your motherboard manufacturer. Even before the mistake shows itself, high temperatures might point to a cooling system issue. Create alarms to let you know should the CPU temperature rise over a certain level—say, 70°C.
- Quality Fan: Invest in a premium CPU fan from a reputed manufacturer for dependable lifetime and performance. A well-made fan will deliver more constant cooling and endure more.
- Regular System Checks: Frequent system checks in the BIOS help to guarantee the fan RPM falls within the intended range. Pay attention also for any odd sounds emanating from the fan.
- Consider a Liquid Cooler: If you are running demanding apps or pushing your CPU to its limits—overclocking—you might want to upgrade to a liquid cooling. More quickly than air coolers, liquid coolers cool.
- BIOS Updates: Maintaining a motherboard BIOS updated will help to guarantee compatibility with the newest hardware and fan control capabilities.
Is a dying motherboard indicated by the CPU Fan Speed Detection Error?
Though it’s not always the case, a ” CPU fan speed detection error” sometimes point to a motherboard issue. Although motherboard fan controller failures are conceivable, usually the fan or fan connection causes problems. Before supposing the motherboard is damaged, always explore the other possible causes. Examine your motherboard closely for any physical damage, including burned components or bulging capacitors, before announcing it dead.
Conclusion
You thus overcame the ” CPU fan speed detection error”! Recall that proactive cooling management of your system is a continual operation. Future difficulties may be avoided mostly by regular cleaning, CPU temperature monitoring, and knowledge of BIOS settings. Although this book offers a strong basis for troubleshooting, if you have ongoing problems or feel uneasy working within your computer, don’t hesitate to see a professional. A perfectly cooled CPU is a happy CPU; a stable and dependable computer results from a happy CPU. Let a basic “CPU fan speed detection error” not become a massive system breakdown!
Has that bothersome “CPU fan speed detection error” been resolved? Tell me right down in the comments!